


Final Image
This is the final image that we’ll be creating:
Introduction
After previously publishing the tutorial Create a Swirly Masterpiece I got a lot of interest in a more detailed tutorial, with a more complete result. This original tutorial showed off a great technique, but today I’m going to expand on that technique.Images + Brushes Used
Here is a list of images and brushes used in the making of this tutorial:Runner Photo
Abstract Brush Set
Swirly Brush Set
Spiral Halftone Brush Set
Dirty Spray
Step 1
Create a new document (600X500px). Create a new layer called ‘background’ and fill your entire canvas with black.
Step 2
Now grab a photo of an athlete (I went with a sprinter) and cut/paste him into the center of your document. Cut out the athlete from their original background using either the path tool or lasso selection tool (I used the lasso tool).Be sure to select a photo exposing a lot of skin, as this is what we’re going to be manipulating.

Step 3
Now duplicate your runner layer and change the blend mode of the duplicate to ‘hard light’ and the layer opacity to 30%. Then duplicate this layer and change the blend mode from hard light to ‘soft light’ and reduce the layer opacity to 10%. Then merge down these two layers, so that you’re left with just one ‘runner’ layer.
Step 4
Now select around your clothes and shoes and copy them to a new top layer called ‘clothes’. You can see the data of this layer below:
Step 5
Now hide your background layers, leaving just your runner on a transparent background. Go to edit>define pattern and call pattern ‘runner pattern’.
Step 6
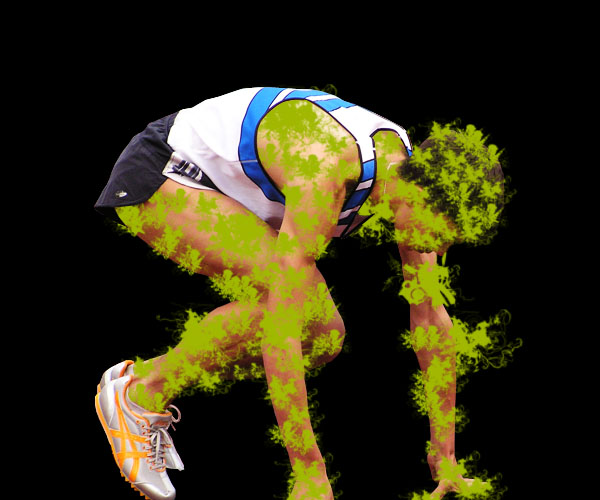
Grab an abstract brush set. Give your brush a nice bright color, and then paint over your runner very roughly, using a variety of brush sizes. You should be really free and rough at this stage, and don’t worry about crossing over into your background or over your runner’s clothes.Now go to your layers palette and option+click on your original runner photo layer to select all the data on this layer (in this case just your runner). Then return to your brush marks layer and go to layer>add layer mask>reveal selection. This will hide all parts of your brush strokes that go past your runner into your background.

Step 7
Now on your brush marks layer go to blending options>pattern overlay and apply your ‘runnerpattern’ pattern. This will effectively make your rough brush marks go from being green, to taking on the data of your runner photo.Then hide your original runner photo. This will leave a patchy version of your runner. Note also how the clothes/shoes are still in tact, because we isolated these on a top layer earlier.


Step 8
Now duplicate your brush marks layer and go to blending options again. Remove your pattern overlay, and instead apply a black color overlay. This should turn your once green brush marks totally black. Now reduce this layer’s opacity to 50%. What this does is darken your brush strokes area. I’m doing this because I want to build up brighter layers on a more shadowed base layer of skin.

Step 9
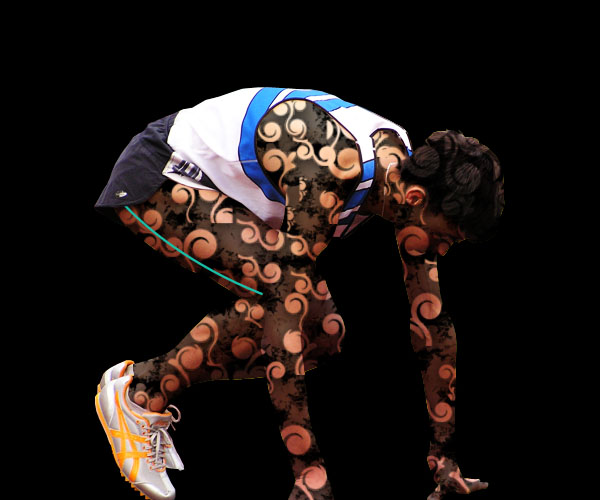
Now grab a Swirly Brush Set. Repeat the same technique that you used for your previous brush strokes, but this time don’t use a black layer, just leave it with a regular pattern overlay effect.


Step 10
Now go to blending options for this layer and apply a drop shadow, outer glow, and stroke effect (settings shown below). This is done to give the impression that your 2nd layer of skin is in fact above the first, and to give your piece better overall lighting and shadowing.


Step 11
Now create a new layer called ‘path lines’. Draw out a path line ranging down the runners thigh. Then with a 2px blue (18BEA8) brush selected, right click on your path with your path tool and click ‘stroke path’. This should stroke your path with a 2px blue line.Then right click on your path again and click ‘delete path’. This will just leave your blue line as a regular shape.
Step 12
Now apply many many more path lines, all on this same layer. Be sure to vary your brush thickness and color, and try to follow the contours of the runners body. Also, bear in mind which limbs are in front of which and don’t let your path lines ruin this effect.
Step 13
Go to blending options for your ‘path lines’ layer, and apply a 1px, black stroke effect at 50% opacity. This will give clean borders to your path lines, and bring out their detail.

Step 14
Now create a new layer called ‘red path lines’. Start by creating a path line down your runner’s arm, and stroke it with a 6px red brush. Then go to edit>transform>perspective and drag in the bottom corners of your shape, and drag out the top corners. Play around with the perspective until your line is not a consistent thickness, but gets thinner at the bottom.
Step 15
Now apply some more red lines using the same technique.
Step 16
Now go to blending options and apply your ‘runnerpattern’ as a pattern overlay. Set the blend mode of your pattern overlay to ‘luminosity’. This will give your blue lines the shadows/lighting of your runner.
Step 17
Now if you remember, we left our original photo as a bottom layer earlier in the tutorial. Copy this layer and make the copy a top layer. Then, use your lasso tool to go in and delete parts of the runner’s skin, exposing the lines and layers beneath it.
Step 18
Now go to blending options for this top layer, and apply a drop shadow effect (settings below). Also, reduce the opacity of your second skin layer from 100% to 70%. Finally, move your top cutout layer beneath your clothes layer, so that your clothes remain completely in tact.

Step 19
If you notice, the runners left foot is cut off due to the detail in the original photo. I want to give it a crazy edge, as this will fit in with the detailed background I also have planned. I use my lasso tool to cut away shards of the foot, creating a more interesting edge.
Step 20
Now take a 1px black brush and draw rough lines over parts of your runner’s skin on a new layer called ‘runner lines’. Now option+click on your cutout runner layer in your layer’s palette to select all data on this layer. Select your ‘runner lines’ layer, and with your selection in place go to layer>apply layer mask>reveal selection. This will cut off the parts of your rough lines that overlap past your runners skin. Finally, reduce your lines layer’s opacity to 25%.

Step 21
Now create a new top layer called ‘runner hair’. Use the previously demonstrated technique of stroking a path line, to create multiple white path lines over the runners hair.Then reduce this layer’s opacity to 60%, and use a large, soft eraser brush to erase away parts of the white lines. Try to erase more of the white lines as they get further away from the top of the head.


Step 22
Create a new layer above your black background layer, but below all of your layers associated with the runner. Use a very large, soft paintbrush to paint in 3 spots of color.Go to filter>blur>motion blur and apply a motion blur of 700 strength.
Finally reduce your paint spots layer’s opacity to 40%.


Step 23
Now grab the brush set Spirals and Halftones and apply some of the brushes on a new layer called ‘brush details’. Try reducing the brush opacity as you get further away from your runner to try and give the impression of depth.
Step 24
Grab the brush set Dirty Sprays. Apply the brushes in white so that it looks like there is a surge of energy behind your runner.And We’re Done!
I really hope that you enjoyed this tutorial, and as always I’d really appreciate your comments.Download Source File for this Tutorial


0 komentar:
Posting Komentar